


Walk in Closet System | Custom by DBM Factory


Walk-In Closet System
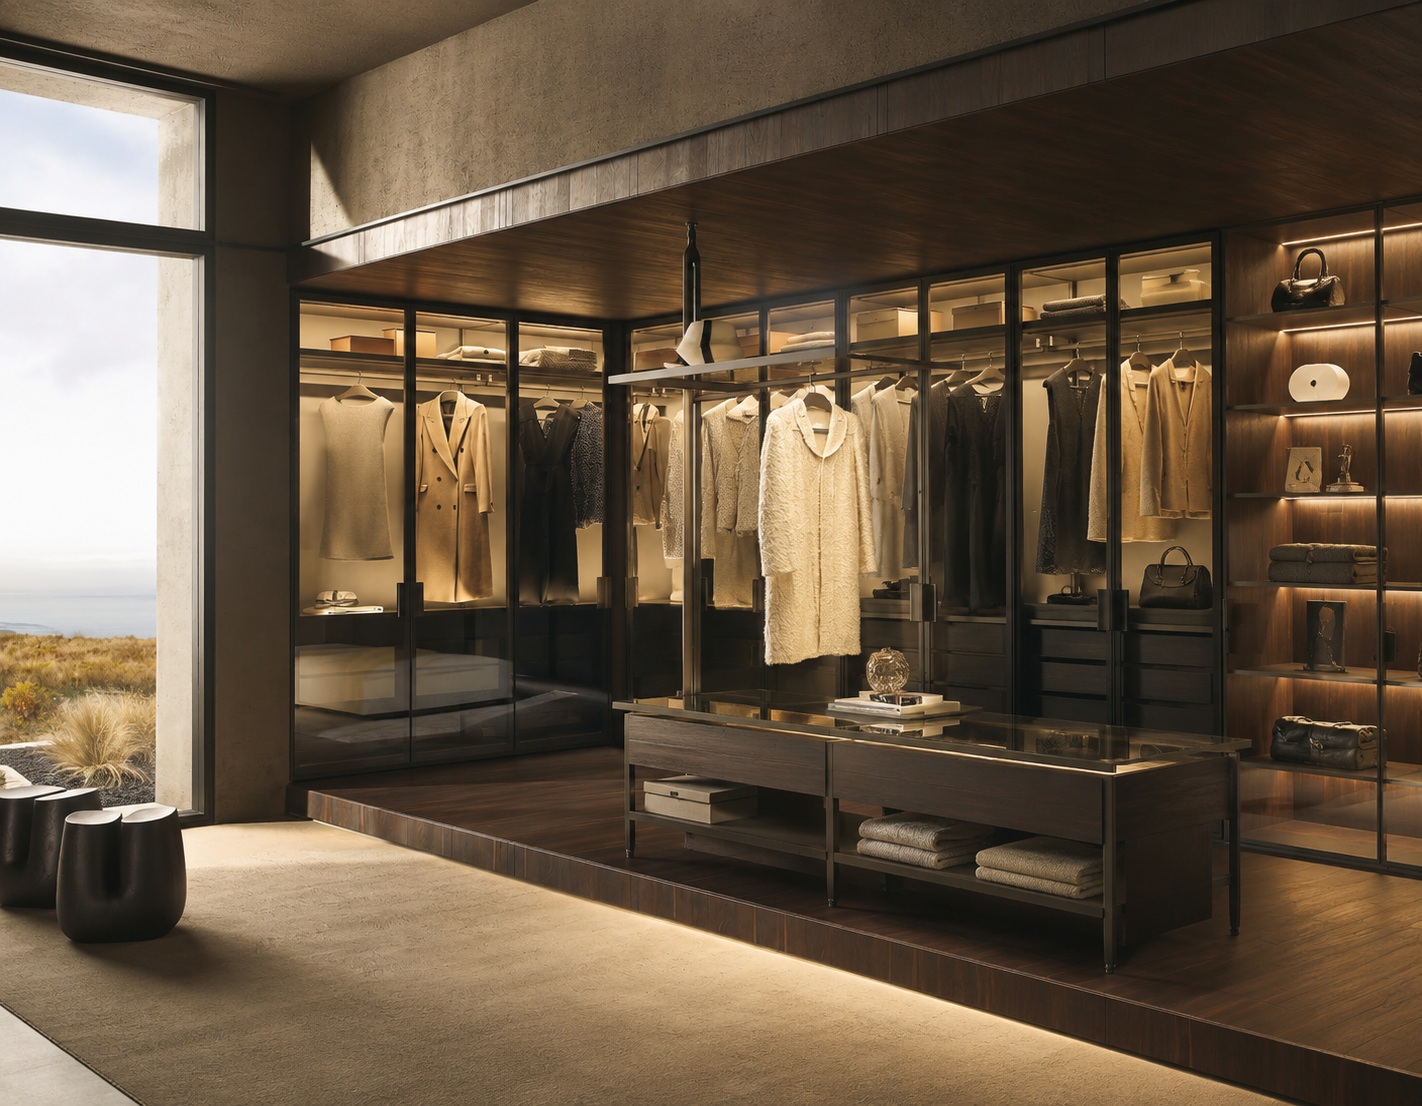
A walk-in closet turns the corner of the master suite into a small dressing room. Hanging on one wall, drawers and shelves opposite, a soft island in the middle where the day’s outfit comes together. Done well it reads less like storage and more like a quiet extension of the bedroom — the kind of room owners notice every morning.
We design and produce each walk-in closet around your project. Share the room dimensions, a floor plan, or a designer reference. We turn it into a working drawing and build each cabinet and module ready for shipment.
Build It Around the Room
Wood Species — Oak / Walnut / Veneer
Quarter-sawn oak for a calm, classic dressing room. Walnut where the owner wants a deeper, richer feel. High-grade veneer over engineered cores keeps wide panels stable in changing humidity.
Finish — Stain or Painted
Natural stain on oak or walnut to keep the grain reading. Painted finishes — ivory, soft white, charcoal — where the closet should disappear into the bedroom palette. Sheen typically matt to satin.
Module Mix — Hang / Shelf / Drawer
Long-hang for dresses and coats. Double-hang for shirts over folded items. Open shelves for bags and shoe displays. Soft-close drawers for foldables and accessories. Final mix set on the working drawing.
Hardware & Lighting — Pulls / LED Cutouts
Brushed brass, satin nickel, or matt black pulls to match the bedroom hardware. LED strip cutouts pre-routed along shelf undersides so your electrician can wire on site without re-cutting.
Where It Fits — Four Common Project Types
Villa Primary Suite
The dressing room sits between the bedroom and the en-suite, often with an island and a full-length mirror at the end of the run. Walnut or stained oak with brass hardware is a common villa direction.
Heritage New Home
Drawn into the architect’s plan from the start so the proportions match the rest of the home. Painted finishes — ivory, soft white — tend to suit traditional palettes; profile-door panels add the period detail.
Estate Renovation
A spare bedroom converted into a dedicated dressing room during a wider renovation. The closet system fits the room as drawn rather than as standard widths, so corners and reveals stay clean.
Vacation Residence
Owner-used second home where the master suite reads as a quiet retreat. Lighter wood tones and painted finishes keep the dressing room visually open against a holiday-house palette.
From Sketch to Site — Three Stages
Share a floor plan, room dimensions, or a designer reference — that’s enough to start. We turn it into a working drawing for the closet system. It covers the module layout, hardware positions, and the openings your contractor will need to allow for.
Every module is fully assembled and photographed in our Guangdong workshop before being taken apart for shipping. Each cabinet, panel, and hardware kit comes labeled, so on-site assembly is straightforward — typically bolt-and-cam, not site-cutting.
Wooden crates built for ocean freight, packed in the order your installer will assemble. Shipped to 60+ countries — including the USA, Australia, the EU, and across Asia.
After delivery, your contractor or installer handles fitting. We provide an assembly guide and a step-by-step video. Where local installation is available in your region, we can help you find a vetted installer.
Walk-In Closet System
When the Spare Room Has an Awkward Corner — Planning a Dressing Room Around an L-Shaped Floor.
Many dressing rooms start life as the wrong shape. A small spare bedroom turns the corner around a chimney breast, or a structural return steals one end, so the floor plan reads as an L rather than a clean rectangle. The owner still wants a calm room to dress in, not a row of cupboards bolted to whatever wall happened to be left over.
Owners reach us right at this point, with a room that has generous space but an irregular plan. The corner is the part that worries them, because two runs of cabinetry meeting at ninety degrees can collide, waste a pocket of depth, or block a drawer from opening. So the brief is rarely about the individual modules. It is about resolving an awkward configuration into a room that feels considered.
Why the Corner Decides the Whole Layout.
The corner is the hinge the rest of the configuration turns on. Where two runs intersect, one of three resolutions has to happen: a drawer bank stops short, a hanging rod runs into the return, or a dead pocket opens behind the junction. Settle that intersection well, and the two elevations read as one continuous wrap rather than two cupboards that happen to touch.
There is a clear reason a walk-in suits this geometry so well. An open dressing room lets you stand inside the L and reach both arms of storage from a single position, so the awkward turn becomes the natural centre of the room. A single fitted wardrobe on one wall would leave the corner idle; the walk-in configuration puts it to work.
The trade-offs stay honest, as always. A tight L demands a careful door swing and adequate circulation through the middle, and a very narrow leg of the room may suit shelving better than a hanging rod. We talk every constraint through against your actual plan, well before any panel is cut.
How We Resolve the Corner on the Drawing.
The Junction Itself Comes First.
We select one wall to run long and let the other die into it, so only one rod meets the corner. The short return then carries shelving or a drawer module that stops a hand-width clear of the junction. That deliberate clearance lets every drawer extend fully, and it keeps two hanging rails from fouling each other in the angle.
The Circulation Comes Next.
A walk-in only succeeds if you can move through it without turning sideways. We set the circulation path down the long leg of the L and keep the corner open as the place you pivot and choose your outfit. A full-length mirror often lands at the far end of that path, so the eye travels the length of the room rather than stopping at the turn.
The Quirks of the Old Room Come Last.
A converted bedroom rarely sits perfectly square. A chimney breast projects out, a window lands mid-wall, or a skirting board runs proud of the plasterwork. We draw the carcasses to wrap the chimney with a shallow shelf bay, to leave the window clear for daylight, and to scribe the end panel against the existing skirting. Nothing has to be trimmed on the floor to make the installation fit.
What Coordination Looks Like for a Corner Walk-In.
Drawing-First Coordination begins with the geometry of the room, not the cabinetry. We confirm the two wall dimensions, the corner angle, and the position of the door, the window, and any chimney breast before anyone cuts a panel. An L-shaped room leaves no tolerance for a guess, so the working drawing resolves the awkward configuration on paper first. We return it for you to walk through against the real space.
Trial Assembly Before Packing then stands the complete run upright on our Guangdong workshop floor. We assemble the corner exactly as drawn, verify that each drawer clears the return, and confirm the rods and shelves align around the angle. Then we dismantle the run, label every carcass and panel, and record the sequence it follows back together under your roof.
Export-Ready Crating packs the components in the sequence your installer will set them, corner pieces grouped so the junction goes up as one clean operation. We protect the finished faces for the long ocean passage and seat the heaviest carcasses low in the crate. The shipment lands sorted, ready to lift, position, and assemble straight against the drawing.
What to Send Us About Your Room.
A rough floor plan of the room tells us the most, even a hand sketch with the two wall lengths marked. Add the ceiling height, and mark where the door, the window, and any chimney breast sit. A few phone photos from the doorway let us read the corner and the skirting the way you see them.
One more note rounds out the picture. Give us a rough sense of what the room has to hold, long-hanging against folded against shoes, and whether you would like an island in the open centre. From there we turn your notes into a working drawing and a fitted dressing room ready to ship.
After delivery, fitting is on your side. On site, your contractor or installer handled fitting directly from our drawings, with our assembly guide and step-by-step video to follow — or use your own local installer where needed.
Chat on WhatsApp →Compare the Reach In Closet System → · see the Built In Wardrobe → · browse the full Closet & Wardrobe range → · or explore all our cabinetry →