


Aluminum Attached Pergola | Custom by DBM Factory


Aluminum Attached Pergola
An attached aluminum pergola extends the indoor living space outward. One side fixes to the house, the other rests on its own posts. A strip of patio becomes a sheltered extension of the room behind the sliders. The aluminum frame keeps the look light and the maintenance low across seasons.
We design and produce each attached pergola around your project. Share a sketch, a site photo, or a design reference. We turn it into a working drawing, fabricate the frame and the wall-mount detail, and prepare everything for shipment.
Choose the Right Build for Your Setting
Wall-Mount Detail — Drawing-Set
Ledger beam fixed to a stud wall, masonry, or a steel beam — the choice depends on the building. We set the fixing pattern on the working drawing so your contractor knows where the bracket spacing lands.
Span Off the Wall — Per Drawing
Narrow projection over a sliding door, or deeper out to a dining and lounge zone. Final span and post layout are set on the working drawing so the roof line and the room behind it stay in proportion.
Frame Finish — Powder-Coat Palette
Matte black or bronze to match the window frames is the common villa pick. White lifts a coastal residence. Custom RAL where the architect has set the cladding colors.
Roof Option — Slat or Louver
Fixed slat roof for the classic open-beam look. Adjustable louvers when the owner wants to shape sun and shelter from the patio. Both share the same wall-mounted frame.
Where It Fits — Four Common Project Types
Villa Terrace
A covered terrace running off the living-room sliders, where the family spends most of the warmer months. Matte black or bronze frame, set so the roof line sits below the upper-floor windows.
New-Home Backyard
Drawn into the architect's plan as a defined covered patio off the great-room. Clean lines and a matte finish make the pergola read as part of the building rather than an after-build addition.
Apartment Rooftop
Penthouse rooftops where the pergola attaches to the parapet or upper-floor wall and projects out over the terrace. The aluminum frame keeps the dead load low — an asset on a roof slab.
Coastal Residence
Aluminum handles salt-air exposure that timber and steel struggle with on seaside lots. White or light bronze finishes match the elevation typical of coastal architecture.
From Sketch to Site — Three Stages
Share a sketch, site photo, or design reference — that’s enough to start. We turn it into a working drawing for the pergola, covering the wall-mount detail, the projection, post positions, and the connections your installer will need.
Frame, ledger beam, roof slats or louvers, posts, and hardware are fully assembled and photographed in our Guangdong workshop before being taken apart for shipping. Each component comes labeled, so on-site assembly is straightforward — typically bolt-together, not field-welding.
Wooden crates built for ocean freight, packed in the order your installer will assemble. Shipped to 60+ countries — including the USA, Australia, the EU, and across Asia.
After delivery, your contractor or installer handles fitting. We provide an assembly guide and a step-by-step video. Where local installation is available in your region, we can help you find a vetted installer.
Aluminum Attached Pergola
A Patio Cover Off the House Wall — Where the Structure Meets the Building.
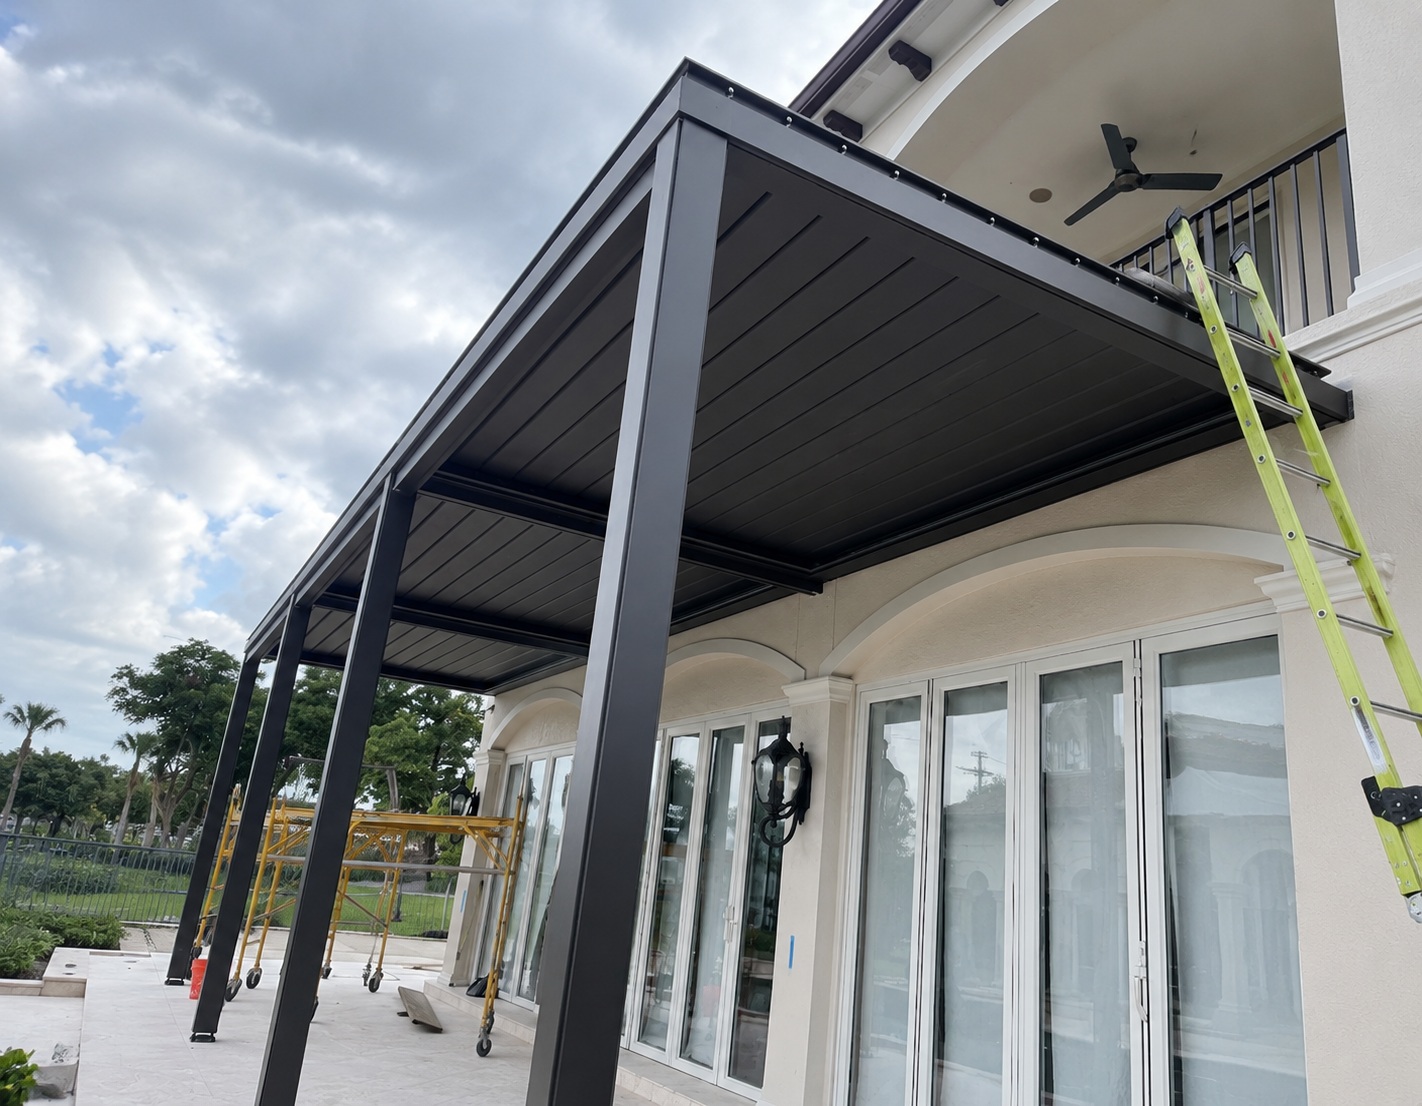
A covered patio against the house is the most natural outdoor room of all. The structure fixes to the rear wall on one side and rests on its own posts on the other, so the patio becomes a sheltered extension of the living space behind the doors. The owner wants that cover to belong to the building, not to look bolted on.
Owners usually approach us once the doorway and the patio already exist and only the cover is missing. The interesting part of the brief is rarely the roof itself. It is the junction where the structure meets the house. That single connection decides how cleanly the cover sits, how it handles the rain, and how it fits beneath the windows above.
Why the Wall Junction Governs the Design.
The connection to the building is the whole problem, and the supporting ledger beam is the answer to it. A detached structure stands on four posts and ignores the house entirely. An attached one replaces the two rear posts with a horizontal beam fixed along the wall, which carries that side of the roof. The wall therefore becomes part of the structure, and its construction governs the fixing detail.
What the wall is made of decides how the ledger attaches. A solid masonry or concrete wall accepts a different anchor than a timber-framed or clad elevation. The fixing has to reach genuine structural material behind the surface finish, not just the cladding. We set the bracket spacing and the fixing pattern on the working drawing for the wall construction the owner describes.
The trade-offs stay honest, as ever. An attached structure reads cleaner against the house and frees the floor of two posts, yet it depends entirely on a wall that can carry the load. Where the elevation offers sound structural backing, though, the wall-fixed configuration typically suits the patio better than a freestanding frame.
How the House Wall Shapes the Build.
What the Wall Is Built From.
The wall construction decides the entire ledger detail. We draw the fixing arrangement for masonry, concrete, or a framed wall, with the bracket spacing and anchor positions marked on the working drawing. The ledger must engage the structural backing rather than the surface finish. Your engineer therefore confirms the wall can carry the load, since the existing construction sits beyond what we can verify from the workshop.
The Height Under the Window.
An upper-floor window often sits directly above the doorway the cover extends from. The ledger beam has to land below the sill with a clearance margin, so the roofline passes under the window cleanly rather than crowding the glass. We fix that mounting height on the drawing against the window position, so the structure sits in proportion with the elevation above it.
Where the Rain Meets the House.
The junction where the roof meets the wall is the line that has to stay watertight. A closed louvre roof drains into the perimeter beam and away through the posts, so water never runs back against the building. We detail that wall transition on the drawing, so the discharge moves outward and the elevation stays dry behind the cover.
What Coordination Looks Like for a Wall-Attached Cover.
Drawing-First Coordination begins at the wall and the doorway. We establish the ledger position, the mounting height beneath the window, and the projection across the patio before anyone cuts metal. A house elevation rarely sits perfectly square, so the working drawing resolves the fixing detail and the clearances early, and prevents an awkward fit against the building later.
Trial Assembly Before Packing then stands the complete structure upright on our Guangdong workshop floor. We fit the ledger, the posts, and the roof, confirm the connections, and verify the frame assembles cleanly before disassembly. Then we label each component as it comes apart, so the build against your wall becomes an ordered bolt-together operation, not field welding beside the house.
Export-Ready Crating packs the parts in the order your installer will raise them on site. We seat the heaviest beams low and protect the finish for the long ocean leg ahead. The crate lands ready to open and sort, with the ledger and fixings marked clearly for the wall connection.
What to Send Us About Your Wall.
A photo of the wall and the doorway, taken straight on, tells us a great deal on its own. Tell us what the wall is built from, whether masonry, concrete, or a framed and clad construction. Then note any window or feature above the doorway, and the projection you want across the patio.
One more line of detail completes the picture. Give us your nearest large town so we can check the local wind zone, and tell us whether you want a slatted roof or a closed louvre roof. From there we turn your notes into a working drawing and a structure ready to ship.
After delivery, fitting is on your side. On site, your contractor or installer handled fitting directly from our drawings, with our assembly guide and step-by-step video to follow — or use your own local installer where needed.
Chat on WhatsApp →Compare the Aluminum Freestanding Pergola → · see the Manual Louvered Pergola → · or browse the full Pergola range →