


How to Build a Floating Staircase: From Drawing to Installed Flight
Floating Staircase · How It’s Built
How to Build a Floating Staircase: From Drawing to Installed Flight
To build a floating staircase, a maker moves through five stages: a working drawing, steel and tread fabrication, a full trial assembly in the workshop, export crating, and on-site installation. Only the last stage happens in your home, because the structure carries real loads and the tolerances run too tight for a flat-pack kit.
We build a floating staircase to order; you cannot buy one off a shelf. The hidden steel structure and the open risers leave no margin for rough work, so almost the entire build happens in a workshop long before anything reaches your home. This guide walks through each of the five stages in turn, explains the comfort geometry behind the treads, and shows why building one is a measured manufacturing job rather than a weekend project.
The Five Stages at a Glance
Every floating staircase we make follows the same five stages, and only the last one happens on your site. The table gives the short version, and the sections below open each stage up in turn.
| Stage | What happens |
|---|---|
| 1. Working drawing | We turn your elevation into a shop drawing, fixing the support method, the rise and run, the materials, and every connection on paper first. |
| 2. Fabrication | We cut and weld the steel carrier, then machine the treads to size and finish. |
| 3. Trial assembly | We stand the complete staircase up in our workshop, inspect every tread, verify the fit, and photograph the result. |
| 4. Crating | We dismantle the staircase, label every part, and export-crate the unit with the finished faces protected for the ocean passage. |
| 5. Site installation | Your installer sets and fixes the staircase from our drawings. This stage is local, and we do not perform it. |
Stage 1: The Working Drawing
Everything starts on paper, because a floating staircase leaves no room to improvise later. We take your architect’s elevation, or even a simple sketch with measurements, and turn it into a full shop drawing. That drawing fixes the support method, the total rise, the number of treads, the tread material and thickness, the railing, and every steel connection in the carrier.
This is also where we match the staircase to your building. We note the wall type, the landing positions, and the opening in the floor above, since each of these decides what the structure can do. We cut nothing until you approve the drawing, because a change after fabrication costs time and money. The hours we spend here are what let the rest of the build run cleanly, and they are the real reason a made-to-order stair fits the first time it goes up.
Stage 2: Fabrication
With the drawing approved, the steel comes first. We cut the carrier, whether it is a central mono-beam, a set of cantilever arms, or a concealed stringer, then weld it to the dimensions on the drawing. We grind the welds back where they will show, and we check the frame against the drawing before it moves on.
The treads take shape in parallel. We machine timber, steel, stone, or glass to the exact size and finish, so each tread is ready to meet its place on the carrier. We powder-coat or paint the steel at this stage too, in a controlled booth rather than on a dusty site. By the end, every component of the staircase exists and carries its final finish, and nothing yet bolts together for good. That last point matters, because the next stage puts the whole thing together as a test.
Stage 3: Trial Assembly
This is the stage that separates a manufactured staircase from a parts order. We stand the complete staircase up on our Guangdong floor, exactly as it will stand in your home. Then we inspect every tread, check the line of the flight, confirm the railing fits, and photograph the finished unit from every angle.
Trial assembly is where any small problem surfaces in the workshop, where it is cheap to put right, rather than on your site, where it is not. A tread that sits a fraction proud, a connection that needs easing, a finish that wants a second look: we catch it here. Only once the whole staircase has stood up and passed does it earn its place in the crate. This single step is why our stairs arrive ready to fit rather than ready to argue with.
Stage 4: Crating for Export
A staircase that survived trial assembly still has to survive the journey. We dismantle the unit carefully, then label every part so your installer can reassemble it in the right order on site. We wrap and protect the finished faces, then pack the components into an export crate built for the ocean passage.
Good crating is quiet, unglamorous work, and it is also where a lot of transit damage is either prevented or caused. We pack the staircase in the order your installer will fit it, so the first piece they need is the first piece out of the crate. The aim is simple: the staircase that stood up cleanly in our workshop should arrive in exactly the same condition, ready to repeat that assembly in your home.
Stage 5: On-Site Installation
The final stage is the only one that happens in your home, and it is the one we do not perform ourselves. Your own contractor or installer sets the carrier, anchors it to the wall or the landings, and fixes the treads and railing from our drawings. Because the staircase arrives complete, labelled, and already trial-fitted, this is a measured set-and-fix rather than a puzzle solved on the floor.
We support that stage with an assembly guide and the trial-assembly photographs, and we can help you find a vetted local installer where that service is available. What we do not do is sign off the installation or the local code; that responsibility sits with your installer and your local authority. The structure they are anchoring is covered in our guide to floating staircase structural design.
Why You Should Not Build a Floating Staircase Yourself
It is tempting to treat any staircase as a carpentry job, but a floating staircase is not one. The hidden steel structure carries real loads, and the open risers leave nothing to cover a rough cut or a loose joint. The skills it needs are steel fabrication, structural detailing, and a controlled finish, not weekend joinery.
There is also no safety net in the look. On a closed traditional stair, a small error hides behind a riser board. On a floating stair, every tread sits in open view, so a tread a few millimetres out announces itself to anyone walking past. That visibility is exactly why we build a floating staircase to a drawing and prove it in trial assembly before it ever ships.
The part we do leave to you is the contained one. A competent installer setting a complete, labelled, pre-fitted staircase from clear drawings is doing measured work with a low risk of surprises. Trying to fabricate the structure from scratch on site is a different and far riskier proposition, and not one we would recommend to a homeowner.
What to Prepare Before You Order
A floating staircase project runs smoothly when a few things are ready before the first drawing. You do not need engineering knowledge; you need clear information about the space the staircase will occupy.
Have your floor-to-floor height, the opening in the floor above, and the wall type to hand, because together they decide which support method is possible. Settle roughly on the tread material and the railing, since both shape the cost and the structure. And if you have an architect’s drawing, share it, because it saves a round of measuring and removes guesswork. With those details ready, we can turn your space into a working drawing quickly, and the rest of the build follows the five stages above. If you are weighing materials, our guide to floating staircase tread materials compares the options.
Getting the Geometry Right: the 7-11 Rule
Comfort underfoot comes from the rise and the run. A widely used guideline is the 7-11 rule: a riser around 7 inches paired with a tread depth around 11 inches gives a natural, comfortable climb. It is a rule of thumb rather than a law, but it is a sound starting point for any stair.
Code then sets the limits. US residential rules commonly cap the riser near 7¾ inches, set a minimum tread depth of around 10 inches, and require consistent dimensions across the whole flight, so no single step surprises your foot. These are widely cited reference values, and your current local edition is what governs, so confirm it with your local team. We lock these numbers on the working drawing before we cut any steel, which is also why every tread in a finished flight matches the next.
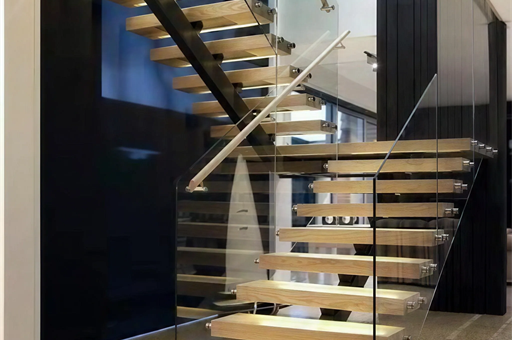
A square-tube floating staircase with glass railing, trial-assembled in our workshop before crating for a Virginia home.
How It’s Built FAQ
Can you build a floating staircase yourself?
Most homeowners should not. A floating staircase hides an engineered steel structure, and the open risers leave no room for rough work. The fabrication and the structural design belong in a workshop. The on-site stage, by contrast, is a contained set-and-fix that a competent installer can handle from clear drawings.
How much do floating stairs cost to build?
Third-party market figures run roughly $15,000 to $60,000 or more installed, and those are industry estimates rather than our quote. The figure depends on size, support, materials, and railing. See our floating staircase cost guide for the full breakdown.
What is the 7-11 stair rule?
It is a comfort guideline: a riser of about 7 inches and a tread depth of about 11 inches make a stair easy to climb. It is a rule of thumb, not a legal limit. Your local code sets the actual maximum riser and minimum tread, so confirm the current edition.
How long does it take to build a floating staircase?
It varies with the design, the material, and the workshop queue, so we quote a lead time per project after the drawing is approved. The drawing and fabrication stages take the most time, while the on-site set-and-fix is usually the shortest part of the whole process.
Do floating stairs come fully assembled?
They arrive complete but knocked down for shipping. We assemble the whole staircase once in our workshop to prove it, then dismantle and label it for the crate. Your installer reassembles it on site in the labelled order, so it goes together the same way it did for us.
Where is a floating staircase actually built?
In a workshop, not on your site. We fabricate the steel carrier and machine the treads in our Guangdong factory, then assemble the whole staircase there to prove that it fits and stands true. After that we crate it for export. The only work left for your site is the final set-and-fix, which your local installer carries out from our drawings and labelled parts. Almost everything that decides quality has already happened by the time the crate arrives.
What information do you need to start a build?
To start the working drawing we need the floor-to-floor height, the opening in the floor above, the wall type, and a rough idea of the tread material and the railing. An architect’s drawing speeds things up, but a clear sketch with measurements is enough to begin. From there we handle the structural detailing and the fabrication, and we confirm the final dimensions with you before we cut any steel.
Background: the floating staircase guide. Related: structural design and tread materials. See a real build: the Virginia floating staircase. Browse the staircase range.
Double Building Materials draws, manufactures, trial-assembles, crates, and ships your staircase. Your own contractor or installer handles on-site installation and local code sign-off — we can help you find one where available. Cost figures above are third-party market estimates, not a DBM price.
Start with a drawing on WhatsApp →