




How to Measure for Kitchen Cabinets: A Step-by-Step Field Guide
Cabinet Guides · Kitchen Cabinet Sizes
To measure a kitchen for cabinets, sketch the room and label each wall, then measure every wall from corner to corner at three heights and keep the smallest number. Add the windows and doors to the outside of their trim, the ceiling height, every utility centerline and the exact appliance models, all to the nearest ⅛ inch.
Good cabinets start with good numbers. A custom kitchen is drawn to your walls, so a careful set of measurements turns directly into boxes that fit, while a careless one turns into filler strips, gaps and expensive surprises on installation day. This guide walks through the measurements a cabinet designer needs, in the order that makes them easy, and explains why each one matters. For the standard sizes these measurements are compared against, see our standard kitchen cabinet sizes guide.
Sizes series The other guides in this five-part series cover the full size chart, base cabinets and toe kicks, wall cabinets and the 18-inch rule and tall and pantry cabinets.
What Do You Need Before You Start?
The essential equipment is a tape measure, a pencil, paper and a phone camera. A 4-foot level helps with the checks later in this guide, and a second person makes long walls far easier to measure accurately. A laser measure is convenient but not essential.
Record everything in inches, to the nearest eighth of an inch, and write 141¼ rather than 11 feet 9¼ inches. Inches add up without conversion, and they are the unit US cabinet drawings use.
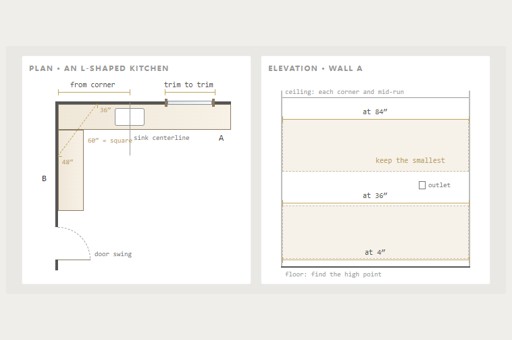
Plan · an L-shaped kitchen
Elevation · wall A
How the measurements fit together. Every position is taken from the same starting corner, in inches, to the nearest ⅛ inch.
Step 1: Sketch the Kitchen and Label Each Wall
Draw the room as if you were looking down from the ceiling. It does not need to be to scale, but it should show every wall, window, door and opening, including walls that will not carry cabinets. KraftMaid's measuring guide suggests labeling each wall with a letter or number, so every later measurement can refer to it.
Mark the general position of the sink, the range and the refrigerator, and any obstructions such as radiators, posts or a chimney breast. Then photograph each wall straight on, with closer photographs of anything unusual. Photographs often answer questions that a sketch alone cannot, especially about trim, outlets and the condition of the walls.
Step 2: Measure Each Wall at Three Heights
Measure every wall from corner to corner, and do it three times: just above the baseboard, at counter height and near the top of the wall cabinets. One cabinet maker's field checklist uses about 4, 36 and 84 inches above the floor. Walls bow, corners collect plaster, and the three numbers are rarely identical.
Keep the smallest of the three, because a cabinet run must fit the narrowest point. The difference between the numbers is useful as well. A wall that is noticeably narrower at one height tells the designer where a scribe molding or a filler will be needed.
Measure every position along a wall from the same starting corner. Numbers taken from one corner add up without arithmetic errors, while numbers chained from one feature to the next quietly accumulate small mistakes.
Step 3: Measure Windows and Doors to the Outside of the Trim
Cabinets stop at the trim, not the glass, so measure each window and door from the outside edge of its casing on one side to the outside edge on the other. Record the distance from your starting corner to the near edge of the casing as well.
For windows, record the height from the floor to the top of the sill and to the top of the head casing. For doors, record the head casing height and which way the door swings. A sill that sits below the backsplash, or a casing that crowds the wall cabinets, is far easier to resolve on paper than on site.
Step 4: Measure the Ceiling at Several Points
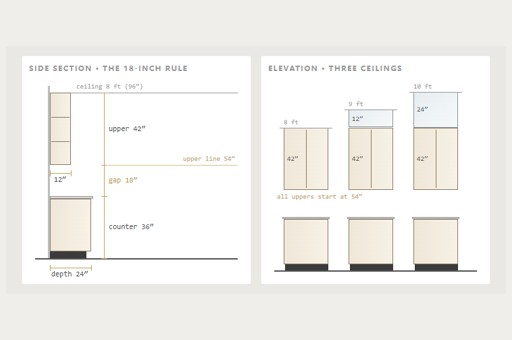
Measure from the floor to the ceiling at every corner of each cabinet wall and in the middle of each run. Ceilings sag and floors slope, and a difference of half an inch matters when cabinets or crown molding run to the ceiling.
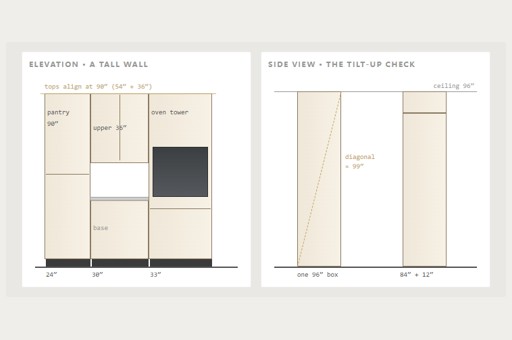
If the kitchen has a soffit, the boxed section where the ceiling drops down, measure both floor to ceiling and floor to soffit, and note how far the soffit projects from the wall. The ceiling height decides the upper cabinets, as our wall cabinet sizes guide explains, and it decides whether a tall pantry can be tilted upright in the room, as our tall pantry cabinet guide shows.
Step 5: Record Every Utility as Two Numbers
Mark every utility on the sketch and give each one two numbers: its centerline distance from the starting corner and its height above the floor. Include the sink drain, the water supply stops, the gas stub, the range receptacle, the refrigerator water valve, every outlet and switch, and any vents or heating registers.
These positions decide where the sink base, the range and the drawer stacks can go. A drain is a plumbing job to move, so decide early whether the sink stays where it is. An outlet that lands behind a cabinet side or a tall panel can usually be relocated before installation, but only if someone notices it in time.
Step 6: Check Square, Plumb and Level
Few rooms are perfectly square, so every corner deserves particular attention. To check a corner, use the 3-4-5 rule at counter height: mark 36 inches along one wall and 48 inches along the other, then measure between the marks. A true right angle gives 60 inches, and anything else tells the designer how far the corner is out.
Hold a 4-foot level vertically against each cabinet wall at both ends and in the middle to check that the wall is plumb. Then lay the level on the floor along each cabinet wall, about 20 inches out where the base cabinets will stand, and find the highest point along the run.
That high point matters because base cabinets are leveled from it and shimmed up everywhere else. It sets the final counter height and the toe kick, which our base cabinet dimensions guide explains. An out-of-square corner opens a gap at the back of the countertop unless the drawings allow for it.
Step 7: Collect the Appliance Specifications
The appliance openings come from the installation instructions for the exact models you will buy, not from typical sizes. Those documents list the cutout or opening size, the clearances and where the utilities must be.
- Refrigerator: width, height including the hinges, depth, and the door clearance it needs to open fully
- Range or cooktop, and the range hood or over-the-range microwave above it
- Dishwasher, plus any undercounter refrigerator, wine cooler or ice maker
- Wall oven or oven and microwave combination, with its cutout dimensions
- The sink model, with its minimum cabinet size
Finalize the appliances before the cabinets are designed. Changing a refrigerator after production can mean a new surround, a new deep cabinet and new panels.
How Do You Measure a Corner or an L-Shaped Kitchen?
In an L-shaped kitchen, both runs start from the shared corner. Measure each wall outward from that corner, and record each feature on that wall from the same point. In a U-shaped kitchen there are two corners, so pick one starting corner per wall and write it on the sketch.
Corner cabinets are where small errors grow. A lazy Susan or blind corner base takes a fixed amount of each wall, so an out-of-square corner or a bowed wall shifts every door after it. That is why the 3-4-5 check belongs at every corner that will carry cabinets.
How Do You Measure Linear Feet of Cabinets?
A linear foot is simply the length of a cabinet run measured along the wall, in feet. Base cabinets and wall cabinets are usually counted separately, and suppliers differ in how they count corners, so ask how any quote treats them.
A price per linear foot is only a rough estimate, because it cannot see the difference between a run of drawers and a run of plain doors. A quote taken from shop drawings counts every box, door, panel and molding, and it changes only when the design changes.
What Are the Most Common Measuring Mistakes?
- Measuring at one height only. The narrowest point can sit anywhere on the wall, so measure at three heights.
- Measuring to the glass. Cabinets meet the window trim, so measure to the outside of the casing.
- Mixing feet and inches. Write every number in inches, to the nearest eighth.
- Chaining measurements. Take every position from the same starting corner.
- Guessing the appliances. Use the installation sheets for the exact models.
- Trusting the old cabinets. In a remodel, photograph the old run and measure the walls wherever you can reach them.
What Should You Send for Drawings and a Quote?
Send the labeled sketch with all the measurements, the photographs of each wall, the ceiling heights, and the appliance models. Add the door style and finish you like and the city where the cabinets will be delivered.
Every box is then drawn to your measurements and returned as shop drawings in inches for your approval before production. Where a number looks inconsistent, it gets questioned on paper rather than discovered on site. On-site measurement and design is also available in the USA, and our custom kitchen cabinets page explains the rest of the process.
When Should a Professional Measure Instead?
- An older house. Walls that are not square or plumb are easier to record in person.
- Cabinets to the ceiling. Stacked uppers and tall pantries depend on an exact ceiling height.
- Built-in appliances. Panel-ready refrigerators and wall ovens leave little room for error.
- A large island. Aisles on every side have to work at once.
- A renovation in progress. Measure after the walls are framed and before the drywall closes them, so blocking and outlets can still move.
Ready to send your measurements?
Send your sketch, photos and appliance list, and we will reply with shop drawings in inches and a factory quote for the whole kitchen.
Send Your Kitchen Layout →More Questions Owners Ask
How do you measure for kitchen cabinets?
Sketch the room, measure each wall corner to corner at three heights, add windows and doors to the outside of the trim, the ceiling height, the utility centerlines and the appliance models, all in inches.
Should I measure in inches or feet?
Use inches to the nearest eighth of an inch, and take every position from the same starting corner of each wall.
How do I measure a corner for cabinets?
Measure each wall outward from the corner and check the corner with the 3-4-5 rule: 36 and 48 inches along the walls should give a 60-inch diagonal.
What is a linear foot of cabinets?
The length of a cabinet run along the wall, in feet. Base and wall cabinets are usually counted separately.
Can you measure my kitchen for me?
On-site measurement and design is available in the USA. Elsewhere, the drawings are made from your measurements and photos.
Related: Standard kitchen cabinet sizes · Base cabinet dimensions · Wall cabinet sizes · Tall pantry cabinet sizes · Custom kitchen cabinets · Florida walnut kitchen
Sources: KraftMaid, how to measure your kitchen. Captivating Cabinets, how to measure a kitchen for cabinets (field checklist).
Double Building Materials draws, builds, trial-assembles, crates and ships custom cabinetry from our factory in Guangdong, China. In the US, our crews and partner installers can install, quoted separately.